How To Tie The Victoria Knot | Medium Size Necktie Knots
Tonight’s the night.
You want to enjoy…but you need to look good too!
So you get ready:
Shirt…check
Jacket…check
Jeans…check
Shoes…check
Necktie…oh wait
You tie your tie as usual…but something’s off.
It just looks a bit too LONG.
Quick solution? The Victoria knot.
It’s easy – learn the steps to tying it below.
Summary Of The Victoria Knot
Size of the knot: Medium
Symmetry: No
Level of difficulty: Easy
Formality: Business-casual or social events
Recommended collars: Point collars, button-down collars
#1. Victoria Knot – History
You guessed it – this knot is named after Queen Victoria of England (although it’s highly unlikely that she wore it herself). There’s no apparent correlation between the style of the knot and the queen herself.
#2. Victoria Knot – Description And Use
But the Victoria knot is (technically) a bulkier, more complex version of a Four-in-hand. By a single extra pass across the front. So maybe “Victoria” has something to do with the fact it’s a bit more sophisticated?
That additional loop is partly the reason why some men prefer it to the four-in-hand – since the final result of the tie is never too lengthy.
At the same time, the Victoria is still a medium-sized knot. It doesn’t reach a point where it requires a wide collar spread or becomes overly bulky in thicker ties.
The Victoria is ideal for skinny ties – where a little extra thickness keeps the knot from pulling so tight and becoming super small. If you’re aiming for something “relaxed” and the four-in-hand isn’t quite cutting it, this is the knot that comes in handy.
Pair it with an adequately narrow point or button-down collar. Unless your tie is very thick, this knot will be too small for a wider spread or cutaway collar.
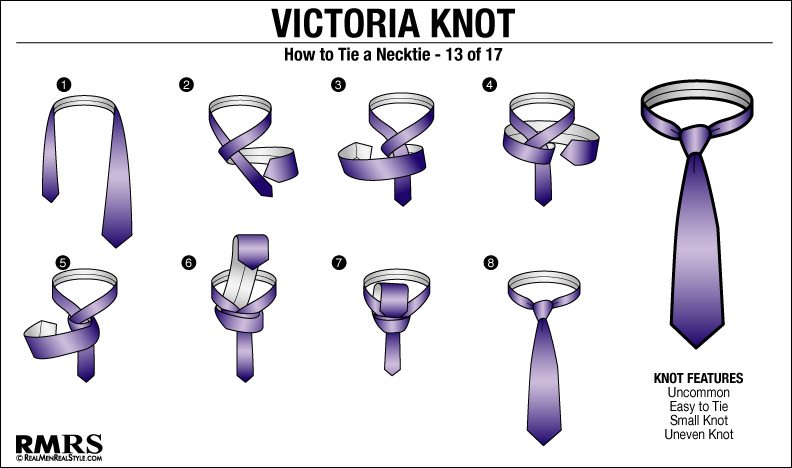
#3. Victoria Knot – Step By Step
Drape the necktie around your collar with its seam inward and the thick end on your left, about 2-3 inches lower than your desired finishing position.
Cross the thick end of the tie horizontally in front of the narrow end and then behind it.
Pass the thick end across the front again from left to right.
Pass the thick end behind the knot from right to left.
Bring the thick end across the front a third time and slip a finger under the new horizontal band you’ve just created.
Insert the thick end through the loop around your collar, coming from underneath it.
Feed the thick end downward through the horizontal band.
Snug the thick end into place. Adjust by holding onto the knot with one hand and pulling gently on the narrow end with the other hand.
Want an infographic that breaks out this process in an easy to understand diagram? Check it out here.
Now for the finishing touches:
Adjust the necktie by holding onto the knot with one hand – and pulling gently on the narrow end with the other hand.
Make some minor adjustments using your fingers if you like. The Victoria knot isn’t symmetrical, so the sides aren’t supposed to appear perfectly even.
Congratulations! Your Victoria knot is complete. You can now head out in style. But now you've learned this knot, don't you think you need a few others in your arsenal? Take a look at our 18 part how to tie a tie series and be prepared for every eventuality!
I'm Antonio Centeno, the founder of RMRS. I'm a former Marine Corps Officer with a BA in Evolutionary Biology and Philosophy (Cornell College 98') and an MBA from The University Of Texas at Austin (07'). I studied the Science of Style in London, Hong Kong, and Bangkok and have created over 5000 videos/ articles to help men dress better. Click here to discover more about me and our mission here at RMRS.
Ready to earn more money and command respect with the right clothing? Want to start dressing sharp today? Click here to discover The Style System , the BEST Professional Style Course on the planet!